
Clawfoot tubs are timeless, elegant, and add character to any bathroom. However, while their freestanding design is visually stunning, they can present challenges when it comes to showering, privacy, or preventing water from splashing everywhere.
Enclosing a clawfoot tub is the perfect solution—it allows you to enjoy both the luxury of a bath and the practicality of a shower.
If you’re planning to upgrade your clawfoot tub setup, follow this 10-step guide to enclose it properly and effectively.
Table of Contents
How To Enclose A Clawfoot Tub: Step-By-Step Process

Step 1: Measure Your Tub and Bathroom Space
Start by carefully measuring your clawfoot tub’s dimensions (length, width, and height) and the space around it. Accurate measurements are crucial when purchasing enclosures, rods, or curtains to ensure a snug and functional fit.
Step 2: Choose Your Enclosure Style
There are several ways to enclose a clawfoot tub:
- Shower Curtain Rod Enclosure: A classic oval or D-shaped rod suspended from the ceiling.
- Glass Enclosure: A more modern option, though it requires professional installation.
- Partial Panel Enclosure: A minimalist design that covers just one side of the tub.
Decide on a style that matches your bathroom décor, budget, and practical needs.
Step 3: Select a Durable Shower Rod
Most clawfoot tubs use ceiling-mounted rods to support shower curtains. Choose between oval, D-shaped, or rectangular rods made of stainless steel or brass for durability and rust resistance.
Recommended Ceiling-Mounted Rods
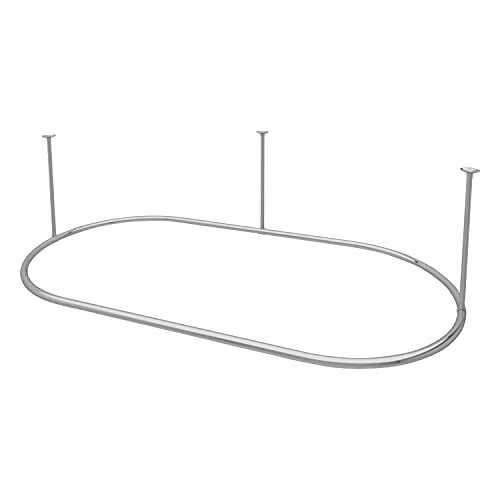
Zenna Home Rustproof Round Shower Curtain Rod

The Zenna Home Rustproof Round Shower Curtain Rod is a practical and stylish solution for enclosing clawfoot and other freestanding tubs. Its unique oval hoop design allows you to mount a curtain rod where traditional straight rods won’t work, making it especially useful for clawfoot tub setups.
Made of lightweight yet durable aluminum, it’s completely rustproof and guaranteed to last. With adjustable height (14–33 inches) and compatibility for tubs up to 70.5″ x 28″, it’s versatile for various bathroom layouts. The included mounting hardware and clear instructions make installation relatively simple, even for DIYers.
Pros:
- Rustproof aluminum construction with lifetime guarantee
- Adjustable height (14–33 inches) for flexible installation
- Fits freestanding tubs up to 70.5″ x 28″
- Stable and secure with wall and ceiling mounts
- Easy-to-follow instructions and all hardware included
Cons:
- May require drilling into ceiling and wall, which could be tricky for some setups
- Installation can be challenging for one person—extra hands may help
Overall Verdict:
The Zenna Home Rustproof Round Shower Curtain Rod is a durable, rust-free, and space-friendly solution for clawfoot tubs. While installation requires some effort, its sturdiness and elegant design make it an excellent choice for creating a fully enclosed shower area around your freestanding tub.
Naiture Stainless Steel Oval Shower Curtain Rod
The Naiture Stainless Steel Oval Shower Curtain Rod is a heavy-duty and elegant solution for enclosing clawfoot tubs, Jacuzzis, or spas. Measuring 60″ x 36″, it’s made of thick 0.8 mm stainless steel, making it stronger and more durable than most competing rods. Its corrosion-resistant chrome finish ensures long-lasting shine, making it suitable even for high-traffic bathrooms, hotels, or B&Bs.
This oval shower rod comes with three 36″ ceiling supports, connectors, flanges, and all necessary hardware for a sturdy installation. Since drilling is required, setup is more permanent and reliable than tension rods, and the supports can be cut to the desired length for a custom fit. Once mounted, the rod provides a stable enclosure that won’t shift or fall, even with heavy use.
Pros:
- Made of heavy-duty 304 stainless steel (rustproof and twice as thick as standard rods)
- Elegant oval design enhances bathroom aesthetics
- Includes three ceiling supports for maximum stability
- Adjustable length—rods and supports can be cut for a custom fit
- Sturdy, secure installation with all hardware included
- Corrosion-resistant and suitable for high-traffic bathrooms, hotels, or B&Bs
Cons:
- Requires drilling, which may be difficult for DIY beginners
- Installation can be time-consuming compared to tension rods
- Permanent mounting may not suit renters
Overall Verdict:
The Naiture Stainless Steel Oval Shower Curtain Rod is a premium, long-lasting choice for enclosing clawfoot tubs. Its heavy-duty build, rustproof stainless steel, and stable ceiling-supported design make it a reliable option for homeowners and businesses alike. While installation takes effort, the durability and elegant appearance make it well worth the investment.
Step 4: Install Ceiling Support Brackets
Since clawfoot tubs don’t sit against a wall, ceiling supports are essential to keep the rod stable. Locate ceiling joists with a stud finder and attach the brackets securely for maximum support.
Step 5: Mount the Shower Rod
Attach the shower rod to the ceiling brackets and wall (if applicable). Make sure it’s level and properly aligned above the tub for full coverage.
Step 6: Choose a Quality Shower Curtain
Go for extra-wide and extra-long shower curtains designed for clawfoot tubs. Standard curtains won’t provide full coverage, leading to water leaks and splashing. Look for mildew-resistant, waterproof materials for easy maintenance.
Step 7: Install Curtain Rings or Hooks
Use rust-resistant rings or roller hooks to hang the curtain. Ensure smooth movement around the rod so you can easily open and close the enclosure.
Step 8: Add a Shower Head and Plumbing Fixtures
If your clawfoot tub doesn’t already have a shower attachment, you’ll need to install a shower riser (a vertical pipe) and a showerhead. Many kits include both the riser and rod for convenience.
Recommended Product: Pyhomestrim Clawfoot Tub Shower Kit

The Pyhomestrim Clawfoot Tub Shower Kit is an all-in-one solution for converting a clawfoot tub into a fully functional shower. It includes a rectangular 48″ x 27″ shower rod, bathcock diverter faucet, 61.25″ shower riser, wall and ceiling support rods, 24 curtain rings, and a 6-inch rainfall showerhead.
Designed specifically for vintage and freestanding tubs, this kit provides both function and style with its chrome-plated finish.
What sets this kit apart is its sturdy construction. Unlike many competitor models that use ¾-inch rods, Pyhomestrim upgrades to 1-inch diameter rods for better durability and stability. The ceiling and wall support rods are also thicker at 5/8 inch, ensuring a secure installation.
The luxury rainfall showerhead adds a spa-like touch, while the adjustable support rods make it easier to adapt to different bathroom layouts—even those with windows near the tub.
Pros:
- Complete all-in-one kit (faucet, shower rod, riser, supports, showerhead, curtain rings)
- Sturdy and durable design with upgraded 1-inch shower rod and thicker support rods
- 6-inch rainfall showerhead provides a more luxurious shower experience
- Flexible installation—supports can be cut or adjusted for various ceiling heights and wall placements
- Stylish chrome-plated finish matches most bathroom fixtures
- Ideal for clawfoot tub to shower conversions
Cons:
- Installation requires precise measurements and drilling, may be challenging for beginners
- Only available in one size (48″ x 27″), which may not fit all clawfoot tubs
- At 6 inches, the rainfall showerhead is nice but may feel small compared to modern oversized models
- More parts to assemble compared to simpler shower rod kits
Overall Verdict:
The Pyhomestrim Clawfoot Tub Shower Kit is a durable, stylish, and complete conversion solution for clawfoot tubs. Its upgraded sturdiness and luxury rainfall showerhead make it stand out among competitors.
While installation requires care and exact measurements, this kit is a great choice for homeowners looking for a reliable, all-in-one tub-to-shower upgrade.
Step 9: Secure the Curtain for Water Control
When showering, pull the curtain completely around the tub so water doesn’t escape. Some homeowners add a weighted hem or use suction cups along the bottom to keep the curtain in place.
Step 10: Add Finishing Touches
Complete your clawfoot tub enclosure with stylish fixtures, such as matching curtain rings, a handheld shower attachment, or decorative finishes that blend with your bathroom’s theme.
Step-by-Step FAQ Checklist: What to Know Before Enclosing a Clawfoot Tub
1. What measurements should I take before buying an enclosure?
Measure the length and width of your tub (outer edge to outer edge) to ensure the shower rod will fit properly. Also, measure the ceiling height above the tub to confirm the ceiling support rods will reach securely. Don’t forget to check the wall distance if your rod needs wall mounts.
2. Do I need to confirm the water supply and faucet setup?
Yes. Make sure your clawfoot tub faucet and shower riser are compatible with the enclosure kit. Many clawfoot tubs use a 3 ⅜-inch center faucet—you’ll want to check before ordering. Some enclosures include the riser and showerhead, while others require you to buy them separately.
3. What kind of shower curtain should I buy?
Clawfoot tubs typically need extra-wide curtains (around 180 inches) to wrap fully around. Also, choose a waterproof liner in addition to the curtain for best protection. If your tub sits near a wall or window, consider two overlapping curtains for full coverage.
4. How can I make sure the enclosure is stable?
Always check how many support rods are included. Oval or rectangular enclosures should have at least one ceiling support and one wall bracket. For larger enclosures, two ceiling supports provide better stability. Avoid tension-only rods unless you’re installing in a lightweight, temporary setting.
5. What tools and prep work should I do before installation?
You’ll usually need a drill, measuring tape, wrench, screwdriver, and level. Before drilling, mark your ceiling and wall placement to ensure the rod is perfectly centered over the tub. Double-check that your ceiling can support the hardware (avoid weak plaster spots).
6. What are common mistakes to avoid?
- Buying a rod that’s too small for your tub.
- Forgetting to purchase an extra-wide shower curtain.
- Installing without adequate ceiling support (rod may sag or shift).
- Not checking plumbing compatibility with your tub faucet and riser.
- Skipping a liner or curtain clips, which leads to water escaping.
Following this checklist ensures you get the right size, the right hardware, and a clean, splash-free installation the first time.
Frequently Asked Questions
What is the best way to enclose a clawfoot tub for a shower?
The most common way to enclose a clawfoot tub is by installing an oval or rectangular shower curtain rod that surrounds the tub. This allows you to hang a shower curtain around the entire perimeter, preventing water from splashing out while you shower. Some people also use custom glass enclosures, but curtains are typically the easiest and most affordable option.
How do I keep water from splashing out of a clawfoot tub shower enclosure?
To minimize water splashes:
Use a properly sized curtain that fully surrounds the tub.
Add liner clips or magnets to keep the curtain in place while showering.
Overlap multiple curtains slightly if one isn’t wide enough.
Position the showerhead inside the curtain area to direct water flow away from openings.
Can I install a clawfoot tub enclosure without drilling into the ceiling?
Yes, some clawfoot tub shower enclosures are wall-mounted only, but most designs are stabilized by ceiling support rods for added strength. If you prefer a no-drill option, you can look for tension-mounted enclosures or adapt your bathroom layout with wall-only supports, though they may not be as sturdy as ceiling-supported models.
Is enclosing a clawfoot tub a DIY-friendly project?
Yes, many homeowners successfully enclose clawfoot tubs themselves. Most kits include a shower rod, riser, supports, and installation hardware. Basic tools (like a drill, wrench, and level) are usually required. However, if your bathroom has tricky layouts (like angled ceilings or nearby windows), or if you’re not comfortable with plumbing adjustments, you may want to hire a professional for installation.
Conclusion
Enclosing a clawfoot tub is a practical and stylish way to enhance the functionality and aesthetic of your bathroom. By following these step-by-step instructions, you can create a versatile shower-tub combo that maintains the classic charm of your clawfoot tub while adding modern convenience.
Remember to measure carefully, choose quality materials, and secure all fixtures properly for a successful installation. With your newly enclosed tub, you’ll enjoy a beautiful and functional space that offers both privacy and a touch of vintage elegance.